Loyalty | Topshopper integration

Topshopper loyalty is a registered third-party value-added service that integrates into ERP Go Enterprise & Business.
Version 1 saw all POS transactions.
This functionality is available in the of 2026.1.0.0

In the previous version of the integration, Topshopper used an application that transmitted the data to the Topshopper web service.
In the new version, a Web Service has been added for Topshopper in the Module Parameters.
Additionally, F9 Loyalty Number / Phone Number input has been incorporated into POS and Invoicing.
This input will automatically appear in POS and Invoicing unless, in the case of Invoicing, a debtor is selected who is already linked to a loyalty account.
Note
Registration: Topshopper requires to be registered
To register for Topshopper navigate to Support --> Register.
Navigate to the Package Details and check that the register tick box for Topshopper integration has been selected.
Select the Package Details tab.
Click on the Save & Send button (bottom-right of screen) and select Send Via Web which will automatically send reg file to the Registrations department.
Note, an internet connection is required for this sending method.
Alternatively, reg file can be exported, saved & emailed to iqregistration@kerridgecs.com.
Irrespective of the way reg file was sent, registrations department will email a reg file back after enabling Topshopper loyalty.
Once received (via email), user will save reg file and import it into ERP Go by clicking on Import Registration under the Advanced button (same place where reg file was exported).
Once Topshopper is registered, the next step would be to select Topshopper as the loyalty provider in Default Settings (2).
1. Select Company Details under the Utilities -> Setup Menu
Click on Default Settings (2).
In the Loyalty Provider dropdown, select Topshopper and click on the Accept button.
Once the Topshopper has been configure, Navigate to Utlities --> Module Parameters (Default Tables.)
Select the Services tab and select the Webservices option below.
Under Web Services, select TopShopper Integration and click on the Enable this Service tick box.
Note, at time of this manual, Topshopper Integration Web Service will only be available in 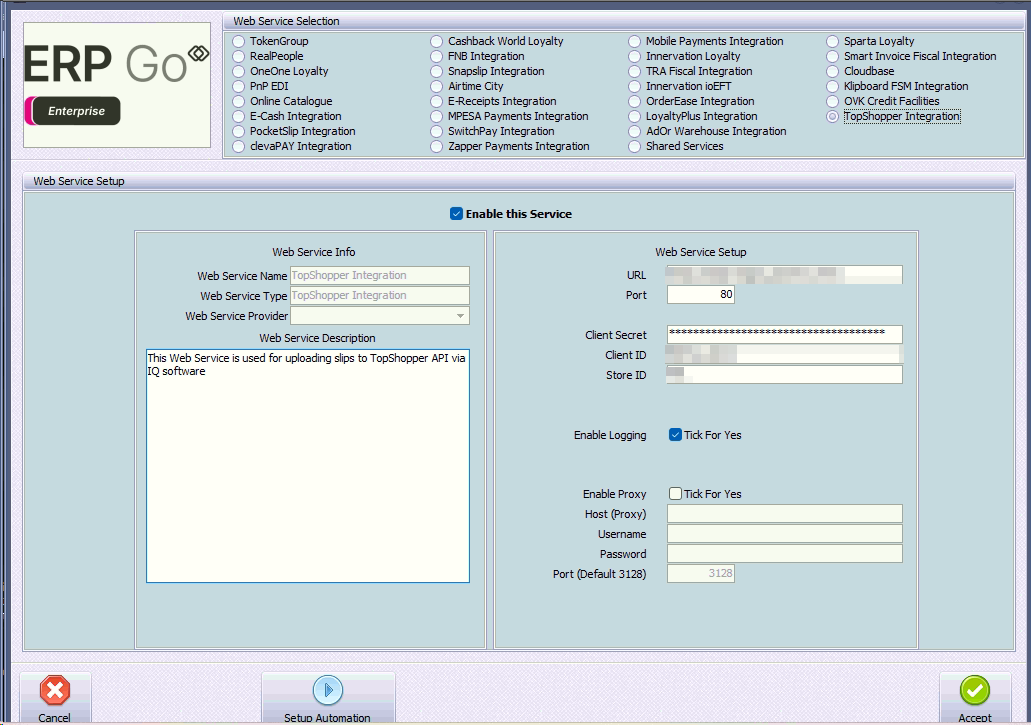 (2026.1.0.0)
For demostration purposes The below URL was used during development / QA testing and will be different from “live” URL.
Be sure to complete fields “URL”, “Port”, “Client Secret”, “Client ID’ & “Store ID” (During development, anything could be typed in the Store ID field).
Click on the Setup Automation button which should display the message below.
Said Automation event is linked to the following event in IQ Automation which is responsible for re-submitting any failed payloads during API submission at point of processing.
During submission (whether at time of processing or retry via automation), a text file (such as below) is read and attached to payload which will see said text file deleted once done.
Related Articles
Topshopper | Note on Debtor Terms (N/A) and Loyalty Number Handling
ERPGo/IQ will display the popup if the Debtor’s Terms are set to N/A. Previously, this functionality only applied to COD accounts, but there are cases where the client may have a buyout account. In such instances, the system would use the loyalty ...Loyalty Plus | Setting up Loyalty
Customer loyalty is the critical objective of customer relationship management and describes the loyalty that is established between a customer and companies, products, or brands. Great attention is therefore given to marketing and customer service ...Loyalty Plus | Redeeming Loyalty
Your customers can redeem their earned loyalty on purchases made in-store. A customer can pay for an in-store sale, in full or partially, with their earned loyalty. To redeem points click on the Gift Card tender or the tender that has been configured ...Loyalty Plus | Debtors | Linking loyalty accounts
It is possible to link a customer or debtor to a loyalty account. To link a account, click on Debtors and click on Maintenance. Select the account to which the loyalty account must be linked to. Click on the Additional Information tab. Click on the ...Loyalty Plus | Selling | Performing Loyalty sale
To perform an loyalty sale, click on Point of Sale -> Sales -> Cash Sale Click on the F9 Loyalty button. Input the member account number just below LoyaltyPlus - Customer Account field. The member details including the available points will display ...